User Interface
Login
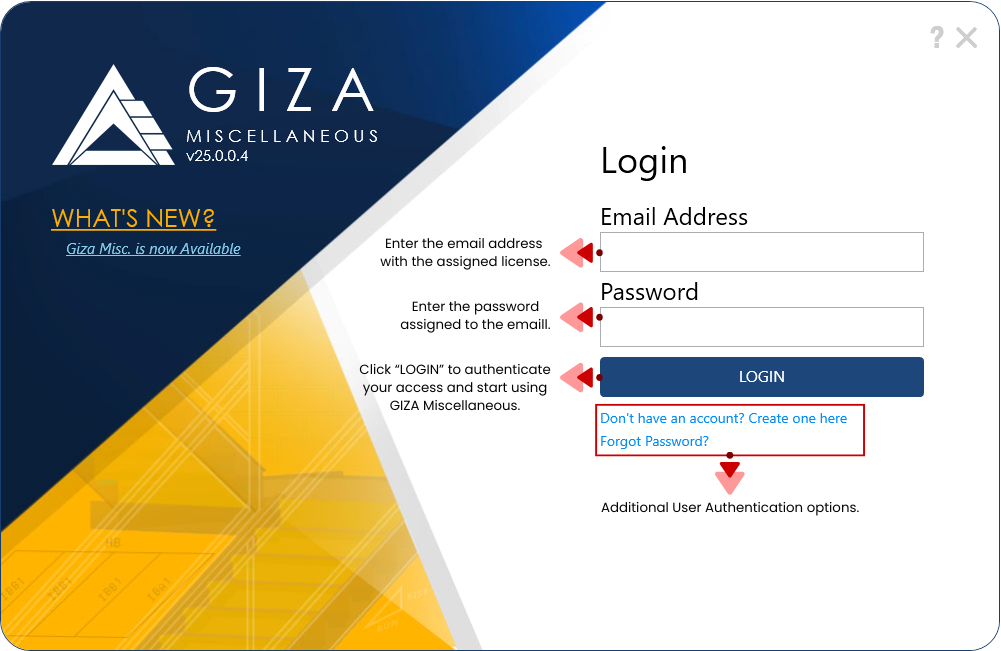
This user interface allows individuals to enter their credentials to access the application. Once licenses are assigned, users must enter their credentials in the login form as specified below and click the Login button to begin using the software. Additional authentication options are provided to securely login, sign up, or recover their accounts, ensuring a seamless and protected user experience.
Start Window
The start screen contains the following elements:
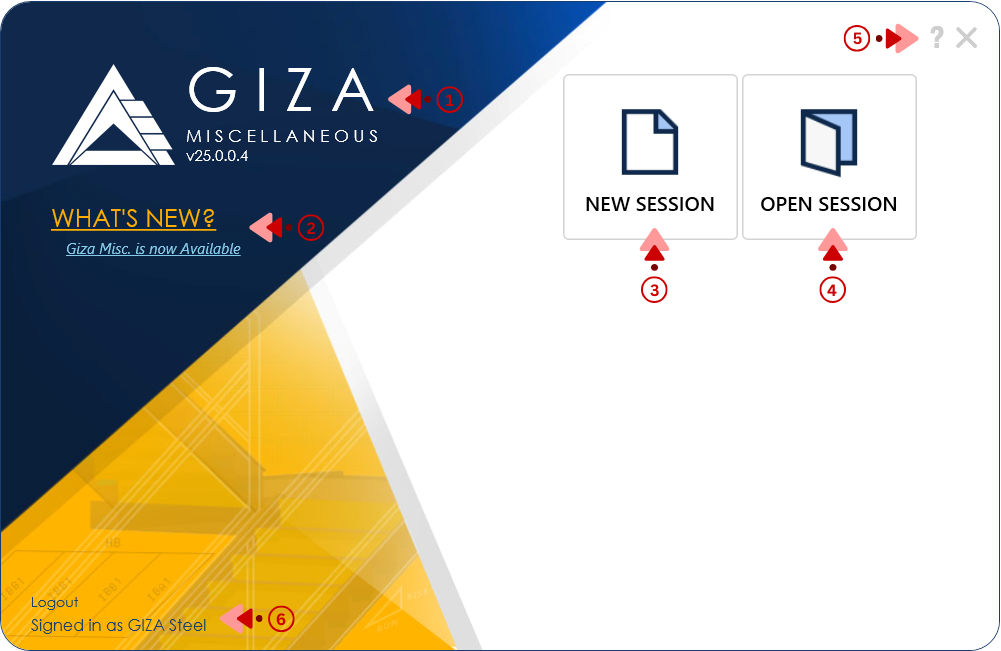
GIZA™ Miscellaneous Logo and Version - Displays the GIZA™ Miscellaneous logo along with the current version
GIZA News - Opens the GIZA website directly on the NEWS page for updates and announcements.
New Session - Creates a new, blank session with default settings.
Open Session - Allows users to open existing .gzm files within the application.
Help File
 - Redirects to the user guide webpage for detailed instructions and support.
Signed-In User - Displays currently logged-in user and logout button
Recent files
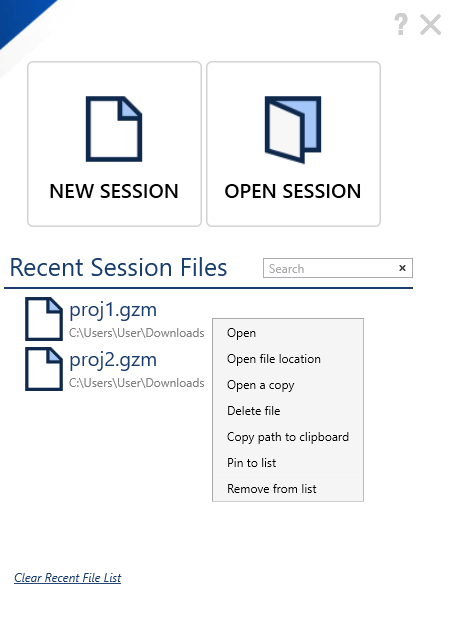
Open - Opens the selected file in the Multiple List View.
Open file location - Opens the file browser to the exact location of the file.
Open a copy - Opens a copy of the selected file in the Multiple List View.
Delete file - Deletes the selected file from the list.
Copy path to clipboard - Copies the file path of the selected file to the clipboard.
Pin to list - Pins the selected file to the recent files list.
Remove from list - Removes the selected file from the recent files list.
Toolbar
The visibility of the toolbar button depends on the tab currently selected by the user.
For the ‘Multiple List View’ tab:

For the ‘Single View’ tab:

New
Users can create a new job session using the New ![]() button in the toolbar. A new session will open in a new tab.
button in the toolbar. A new session will open in a new tab.
Open
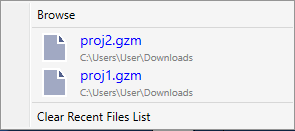
The Open ![]() button allows users to access and open an existing .gzm file. When the application contains a list of recent files, the context menu displays a Browse button, the recent files list, and a Clear Recent File List option.
button allows users to access and open an existing .gzm file. When the application contains a list of recent files, the context menu displays a Browse button, the recent files list, and a Clear Recent File List option.
Click the Browse to option launch a file browser.
Click a file in the recent files list to open the selected file in a new tab.
Click the Clear Recent File List option to remove all entries from the recent file list.
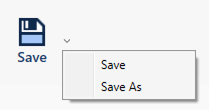
Save
Clicking the Save ![]() button opens a context menu with Save and Save As options. Once the session is saved, the red asterisk on the tab will disappear.
button opens a context menu with Save and Save As options. Once the session is saved, the red asterisk on the tab will disappear.
Click the Save to option update the current file with any changes. If the file already exists, it will be overwritten without prompting for a new file name or location.
Click the Save As to option create a new copy of the current file. It prompts the user to choose a file name and location.
Report
The Report ![]() button allows the user to modify the print options of a report file, if needed. It generates, Prints, and Saves as PDF the calculation report file of a session or a template.
button allows the user to modify the print options of a report file, if needed. It generates, Prints, and Saves as PDF the calculation report file of a session or a template.
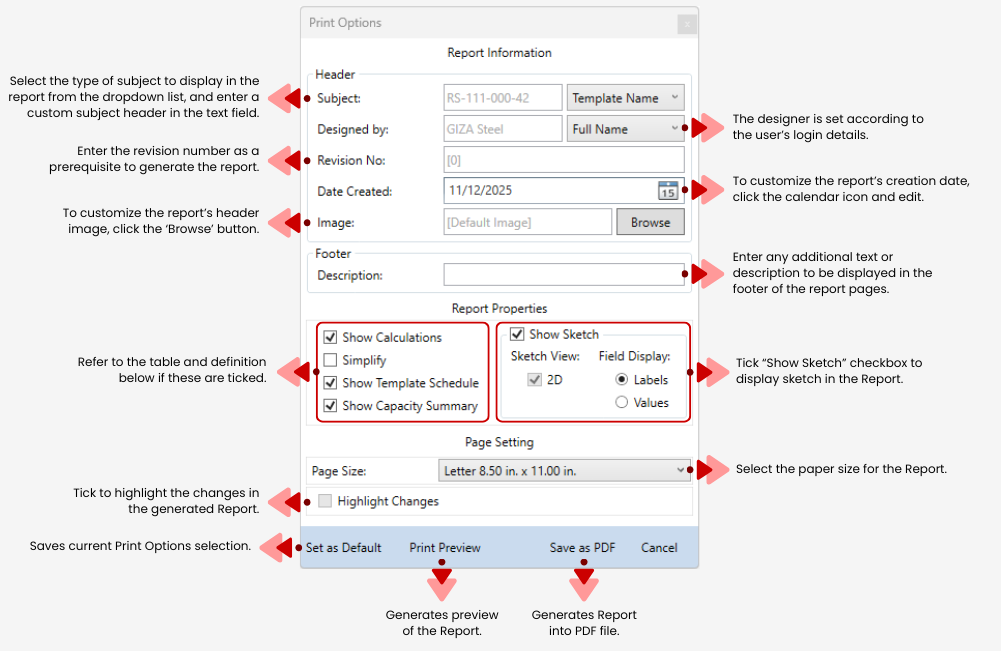
Print Preview becomes available when Report is selected in Single View; it is not available in Multiple List View.
The Add Maps Images group is enabled only for sessions with the ladders template.
Marked items will be displayed in the report when checked in the options, otherwise these will be hidden:
For Wall Rail and Railing System
Section
Description
Show Calculation
Show Template Schedule
Show Capacity Summary
Show Sketch
MEMBER DESIGN
I.
Design Data and Loads
✓
II.
Calculations
✓
III.
Details
A.
Capacity Summary
✓
B.
Schedule
✓
CONNECTION DESIGN
I.
Verification of End Connection
✓
II.
Calculations
✓
III.
Details
✓
A.
Capacity Summary
✓
B.
Schedule
✓
IV.
Sketch
✓
V.
References
✓
For Stairs
Section
Description
Show Calculation
Show Template Schedule
Show Capacity Summary
Add Maps Images
Show Sketch
I.
Design Criteria and References
✓
II.
Safety and Resistance
✓
III.
Maps
A.
Stair Location
✓
B.
Framing Layout
✓
C.
Model
✓
IV.
Member Properties
✓
V.
Member Analysis
✓
VI.
Member Verification
✓
VII.
Verification Summary
✓
VIII.
Framing Layout
A.
Sketch
✓
B.
Schedule
✓
IX.
Stair Frame End Reaction Summary
✓
Ladders
Section
Description
Show Calculation
Show Template Schedule
Show Capacity Summary
Show Sketch
I.
MEMBER DESIGN
A.
Design Data
✓
B.
Design Load
✓
C.
Calculation
✓
II.
END CONNECTION 1 DESIGN
A.
Design Data
✓
B.
Design Load
✓
C.
Calculation
✓
III.
END CONNECTION 2 DESIGN
A.
Design Data
✓
B.
Design Load
✓
C.
Calculation
✓
IV.
END CONNECTION 3 DESIGN
A.
Design Data
✓
B.
Design Load
✓
C.
Calculation
✓
V.
DETAILS
A.
Connection Map
✓
B.
Ladder Details
✓
C.
End Connection Details
✓
D.
Capacity Summary
✓
VI.
REFERENCES
✓
✓
✓
✓
Help
The Help ![]() button provides GIZA™ Miscellaneous User Guide on how to navigate the application, its features, functionality, and interface.
button provides GIZA™ Miscellaneous User Guide on how to navigate the application, its features, functionality, and interface.
Click the Help button in the toolbar to open the GIZA Miscellaneous Help file at the Home page.
Browse the user guide or use the search bar to find information efficiently.

About
The About ![]() button displays the software’s current version, copyright details, and the company’s online support contact information.
button displays the software’s current version, copyright details, and the company’s online support contact information.

Views
Multiple List View
- Session Information
Includes job details, and design methodology. Users can toggle this section on or off to maximize the template’s multi-list area.
Template Multiple List
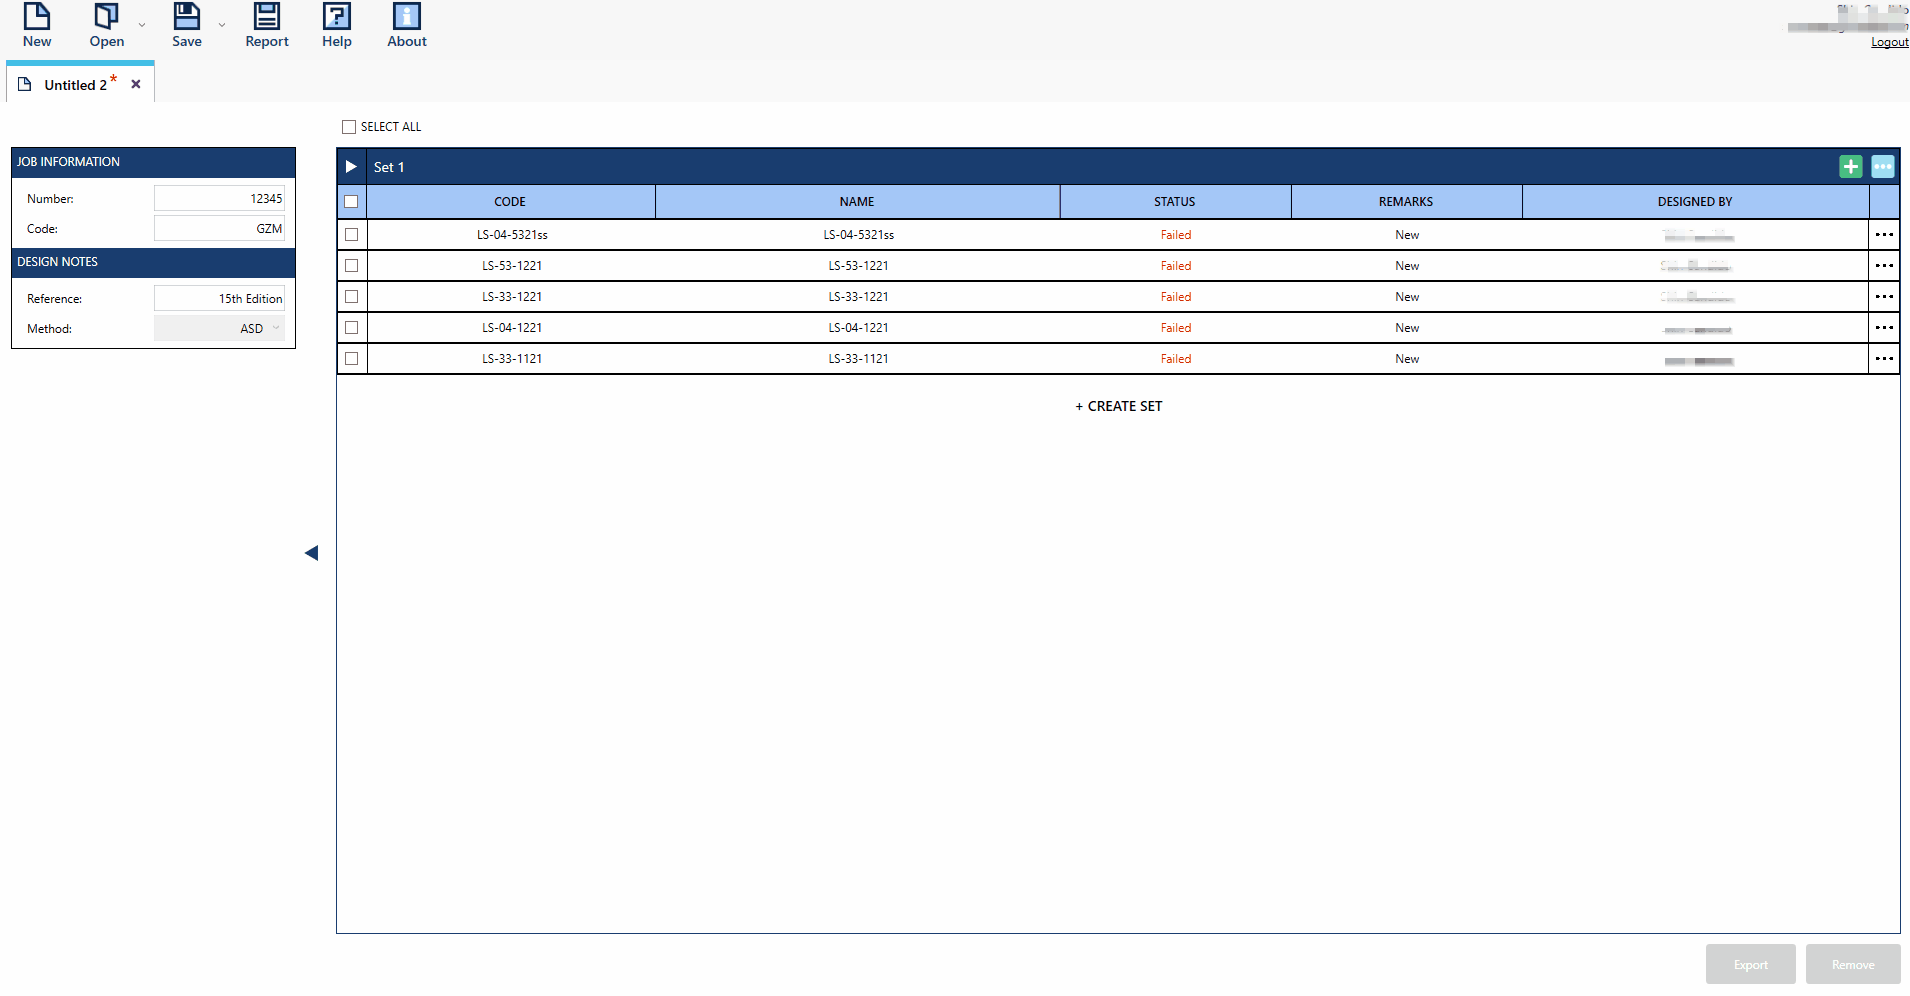
In the list of sets and templates, the templates are highlighted when hovered over. Users can easily rearrange templates within a set or move them between sets. This feature offers flexibility, allowing users to organize and sequence templates effortlessly within the session.
User can also Import, Delete, and Duplicate Set(s) by clicking this button  on the upper right side of the Sets section and selecting the desired option from the dropdown menu.
The user can click the Template  menu template menu on the right side of each template to open a list of options to open, rename, move, or duplicate the template.
Context Menu Options:
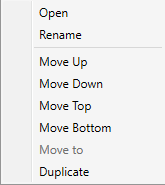
Open: Opens the template in Single View. Double-click in the template to quickly open the template in SV.
Rename: Allows the user to rename the template.
Move Up: Moves the selected template one position up.
Move Down: Moves the selected template one position down.
Move Top: Moves the selected template to the top of the set.
Move Bottom: Moves the selected template to the bottom of the set.
Move To: Moves the selected template from one set to another.
Duplicate: Duplicates the selected template within the same set.
Set Menu Options:
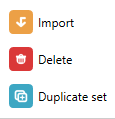
Import: Imports a set from another session into the current session.
Delete: Deletes the selected set from the session.
Duplicate: Duplicates the selected set within the session.
Single View
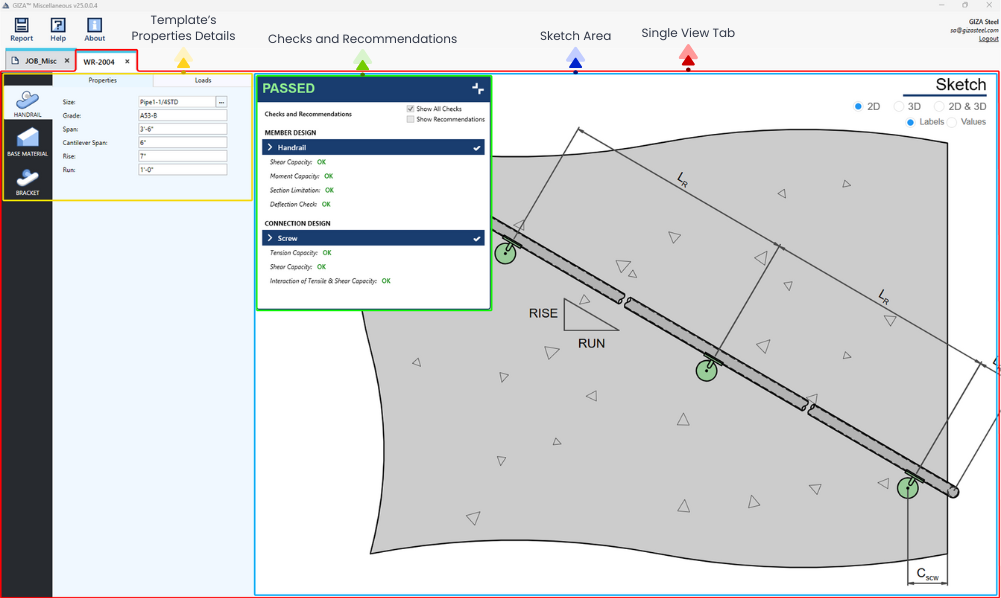
- Template Properties
The template properties consist of the main tabs and sub-tabs of the template, with material property values available for editing.
- Checks and Recommendation
This section displays limit state checks, their statuses/remarks, and the recommended properties for adjustments.
- Sketch Area
This section shows how sketches are presented in 2D, with labels or values, and in 3D for improved visualization.
Template Selector
Template Selector is where the list of supported templates is displayed. The user can select and add the desired template by either selecting the template and clicking the Add button or by double-clicking the template. To view the list of supported templates in the Template Selector, click on the dropdown of each template type to expand the list of templates under that type.
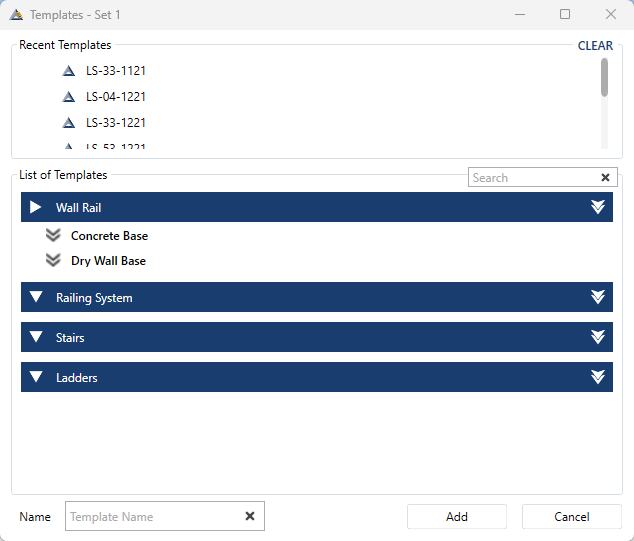
Other features:
Recent Templates - Templates recently added to a set in the multiple list view are listed here.
Clear button - Located in the upper right corner of the Recent Templates pane, used to clear the list of recently added templates.
Name textbox - Located at the bottom of the Template Selector window, used to set the name of the desired template.